Basic Tutorials for Beginners

Welcome to Photoshop4Photographers! This blog was created to help out individuals who are learning Photoshop & photography. Please check back frequently for free downloadable PS Actions and tutorials.
Share/Save/Bookmark

Friday, May 8, 2009

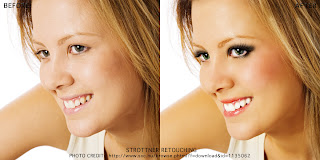
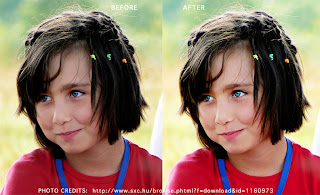
Before | After

Hey All! Quick post of some before & afters I've worked on recently. I'm currently writing up a tutorial on how to edit for glamor shots but the tutorial might be quite long, so look forward to it soon. I will have blemish correction, red-eye correction, liquidfy tool, adding makeup, sharpen and overall boost. In the meantime, here's a sneak peek!


http://www.modelmayhem.com/pics.php?id=1137354

Monday, May 4, 2009

CROSS PROCESSING TUTORIAL IN PHOTOSHOP

This is a quick cross processing tutorial for Photoshop. Please feel free to comment to this tutorial with a link to your edited picture. I always love seeing people's results!
(1) Open your picture
in Photoshop.

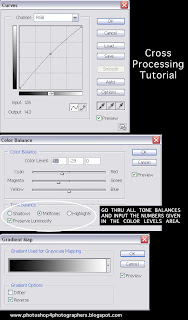
(2) Click on "Create New Fill or Adjustment Layer" in your layers palette. Choose "Curves..."

(3) Move the curve to approximately: INPUT: 126, OUTPUT: 143. Click OK.

(4) Once again, click on "Create New Fill or Adjustment Layer" in your layers palette. Choose "Color Balance..."

(5) On your Color Bala
nce pop up, select SHADOWS and check off "Preserve Luminosity". Type in the following color levels: -36, 0, 0. Now choose MIDTONES and input these numbers: -19, -29, 0. Finally, choose HIGHLIGHTS and input: +20, -26, -18. Click OK.

(6) C
lick on "Create New Fill or Adjustment Layer" in your layers palette. Choose "Gradient Map..."

(7) Gradient used for Grayscale Mapping should be chosen...Fades black to white. Now check off "Reverse".

...And that's it! You should now have a picture that looks cross processed. If the image looks too dark or light, you can adjust the curves layer. Hope you like!

Saturday, May 2, 2009

FREE ACTIONS!


Hi All! Below is a link to download two free Photoshop actions that were created in PS7. The first action is called Color Pop Action which gives a very subtle color enhancement along with sharpening. This is a great action for portraits. The second action is called Color Enhance and it does just that...enhances the colors in your photo. This action can be used on both portraits and landscape shots.

To the left are the examples of the original photo along with each action result. The bottom right photo is the end result from using BOTH actions.

FREE ACTIONS - DOWNLOAD HERE.

Please enjoy these free actions! Should you use it and like your results, feel free to comment with a link of the photo. I always like seeing what the actions look like in other people's photos.


Friday, May 1, 2009

EYE POP TUTORIAL


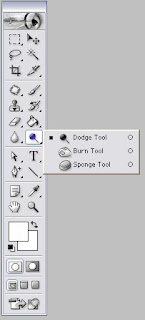
A very common digital edit is making the eyes POP! on portraits. This can be done quite easily on Photoshop with the Dodge/Burn Tool (see screenshot). In the photo below, I have done several things in PS other than just the eye pop. They include: Color Pop, Curves Adjustment and the High Pass Filter (for the eyes, nose & mouth). To achieve the eye pop, do the following:

1. Select the dodge tool and input the following settings: Soft Brush, Range: Highlights, Exposure 25%.

2. Make sure your soft brush is the same size as the pupil.

3. Using the soft brush, click
on the eye several times until you receive the desired effect.

4. Eyes should look bright & sharp, so I also applied the High Pass Filter to a duplicated layer, located under FILTER>OTHER>HIGH PASS.

5. Change the Blending Mode to Soft Light.


6. Add a layer mask to the High Pass Layer and fill with black (if the original layer mask was white, or vice versa if the layer is black, use white). With a white soft brush, paint over the eyes, nose, mouth and any other areas you may want sharpened.


And that's it! If you have a better way of making the eyes pop, please let me know! ENJOY!

Thursday, April 30, 2009

B&W CONVERSION

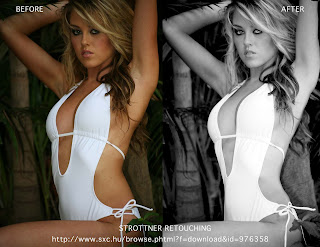
Here's a tutorial for converting your color images to Black & White. While desaturated is a super easy way to turn a photo into B&W, I prefer using Lab Color Mode because the initial conversion already has more contrast than desaturated.
  • First, apply any adjustments you may want to do beforehand. For example, sharpen or color correction (performed in this photo).
  • Flatten image and then go IMAGE>MODE>LAB COLOR.
  • Select the Channels tab in the Layers Palette.
  • Click on the "Lightness" channel. CTRL+A to select the entire picture then press CTRL+C to copy the Lightness channel.
  • Go IMAGE>MODE>RGB COLOR to return to the RGB mode.
  • Now go back to your channels tab and under each channel (Red, Green, Blue), CTRL+V to paste the original Lightness channel you copied in Lab Mode.
  • Once complete, go back to the layers tab.
  • To adjust the contrast to your liking. I use the Levels Adjustment, which is located under "Create New Fill or Adjustment Layer".
*Using the Create New Fill or Adjustment Layer is best when editing photos instead of using IMAGE>ADJUSTMENTS section. This is because you are not altering the original photo and will always have that original layer.

Click here for other pictures that have been converted to B&W!

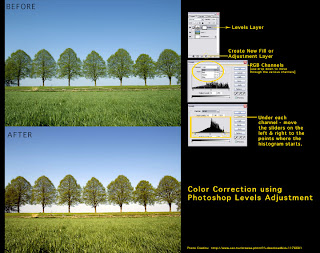
QUICK COLOR CORRECTION TUTORIAL


Here's a quick tutorial for color correction using the Levels Adjustment Layer.

(1) In Photoshop, open the photo that needs color correction.

(2) On your layers palette, select "Create New Fill or Adjustment Layer" (the black & white circle).

(3) Select Levels.

(4) Under each channel, move the sliders on the left and right to the points where the histogram starts.

Click on the image above for screenshots of this tutorial!

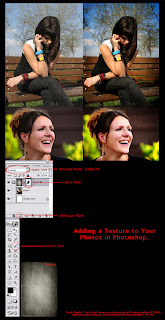
ADDING TEXTURES TO YOUR PHOTOS IN PHOTOSHOP


Adding a texture in Photoshop is quite easy and adds a great look to your photos. There are many websites that allow you to use their textures for free (you may have to credit them) or you can create your own texture. Please find below for a short tutorial on how to add textures to your photos!
  • Open the photo you would like to add the texture to in Photoshop.
  • If you would like like to add color pop or any other PS treatments, do so now. In the photos to the left, I have given both photos a boost in color. [I will create a tutorial at a later date on how to create a Color Pop Action!]
  • So now you want to find a texture that you can use for your photos. *Always try various textures since the results will vary.
  • Open that texture in Photoshop (if saved) or if you copied from a website, paste over your current photo. If the texture is not the same size as your photo, go to: Edit>Free Transform. Your texture layer will now have points on it in which you can drag and resize the texture. To exit from "Free Transform", click on another tool from the toolbar. You will receive the following pop-up, "Apply the transformation?" Click Apply.
  • Go to your blending mode in your layers and go thru the blending modes to achieve the desired look. In the two examples provided, I used Overlay at 100%.
  • Now make sure your texture layer is highlighted and "Add Layer Mask" in your layers palette (see image). A layer mask will be added to the texture layer.
  • Select the layer mask. Typically it is white but sometimes black. Select a soft brush and the brush color should be opposite of what you are seeing as the layer mask. So for example, if your layer mask is white, select black as your foreground color. If your layer mask is black, select white as your foreground color.
  • With your soft brush, paint over the areas you don't want the texture on (ie: faces, arms, etc.).
Viola! You should now have a great textured photograph!
**Click above image for large view.**

Click Here for More Texture Results